
Did you know that nearly 70% of homeowners experience issues with their water heaters at some point? If you’re facing unexpected cold showers or inconsistent hot water, you’re not alone. Understanding how to troubleshoot your water heater can save you time and money. Let’s explore some expert tips that can help you diagnose and potentially fix the problem before it escalates.
Check the Power Supply or Gas Line
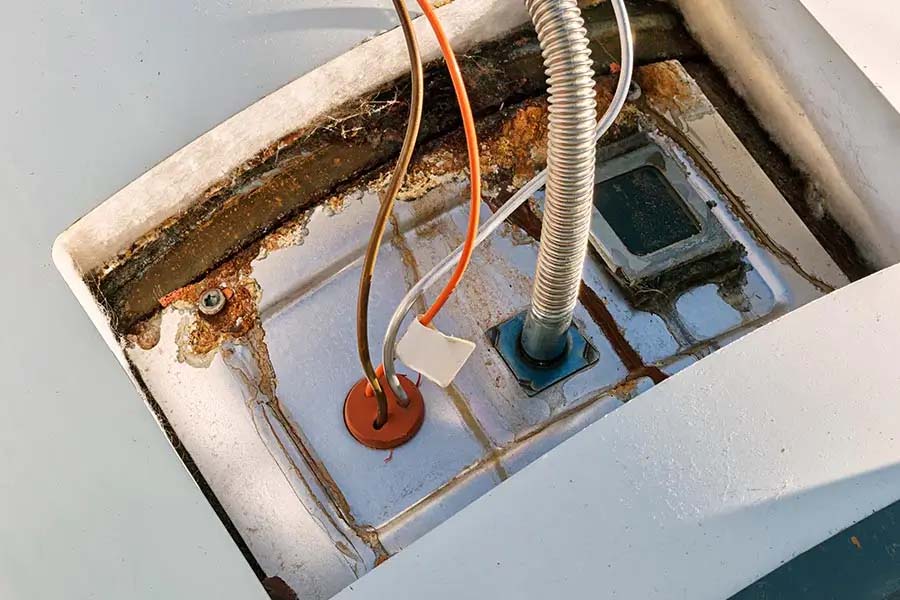
Have you checked the power supply or gas line? This is the first step in troubleshooting your broken water heater.
If you’ve got an electric water heater, verify it’s plugged in and that the circuit breaker hasn’t tripped. A simple reset might do the trick.
For gas water heaters, look for any issues with the gas line. Make sure the gas valve is open and there’s no visible damage or leaks. If you smell gas, evacuate immediately and call a professional.
You should also inspect any pilot lights; if they’ve gone out, follow the manufacturer’s instructions to relight them carefully.
By checking these basics, you can often identify the issue without any costly repairs. Remember, if you’re unsure or uncomfortable with any steps, it’s always best to reach out to a qualified technician. Upgrading to a new model can also ensure better energy efficiency and performance.
At Trifecta Plumbing, we’re here to help you get your hot water back on track quickly and safely.
Inspect the Thermostat Settings
Before diving into more complex issues, it’s important to check your thermostat settings, as they play a crucial role in regulating your water heater’s temperature.
Start by locating the thermostat on your unit, which is usually near the top or bottom. Make sure it’s set to your desired temperature, typically around 120°F (49°C) for peak performance and safety. If it’s set too low, your water won’t be hot enough; too high, and you risk scalding and energy waste.
If the settings seem correct but you’re still having issues, consider resetting the thermostat. Turn it off, wait a minute, then turn it back on. This simple step can sometimes resolve minor glitches.
Finally, if adjustments don’t solve the problem, it might indicate a faulty thermostat, which may require professional attention. Remember, keeping your thermostat in check can save you time and hassle in the long run. Additionally, regular maintenance from professionals can help ensure your unit operates efficiently, providing endless hot water when you need it most.
Examine the Circuit Breaker or Fuses
Before moving on, check your circuit breaker or fuses to guarantee everything’s functioning properly. A tripped breaker or a blown fuse could be the reason your water heater isn’t heating. Take a moment to inspect these components for any signs of damage or issues. If you encounter persistent problems, consider reaching out to experienced technicians who specialize in quick diagnostics and repairs.
Check Circuit Breaker Status
Checking the circuit breaker status is an essential first step when your water heater isn’t functioning properly.
Start by locating your home’s electrical panel, which is usually in the basement or utility room. Once you find it, look for any tripped breakers. A breaker that’s in the “off” position means it needs to be reset. Simply flip it back to the “on” position.
If it trips again shortly after resetting, there might be a more significant issue at play. In that case, it’s best to consult a professional. Remember, always prioritize safety—if you’re unsure, don’t hesitate to call for help.
Keeping your circuit breaker in check can save you time and headaches down the line.
Inspect Fuses for Damage
After confirming the circuit breakers are functioning correctly, it’s time to inspect the fuses for any signs of damage.
Fuses can blow for various reasons, and recognizing issues early can save you headaches later. Here’s what to look for:
- Visual Inspection: Check for any discoloration or melt marks on the fuse.
- Test Each Fuse: Use a multimeter to confirm each fuse is conducting electricity properly.
- Check the Connections: Make sure all connections are secure and free from corrosion.
- Replace if Necessary: If a fuse is damaged, replace it with one that matches the wattage specifications.
Look for Leaks or Water Accumulation
When checking your water heater, it’s essential to inspect for any visible leaks or signs of water accumulation.
Make sure to examine the condition of the drain pan, as a damaged pan can lead to bigger issues.
Also, keep an eye on the surrounding area for dampness, which could indicate a hidden problem. Early identification of leaks can prevent costly repairs from structural damage.
Inspect for Visible Leaks
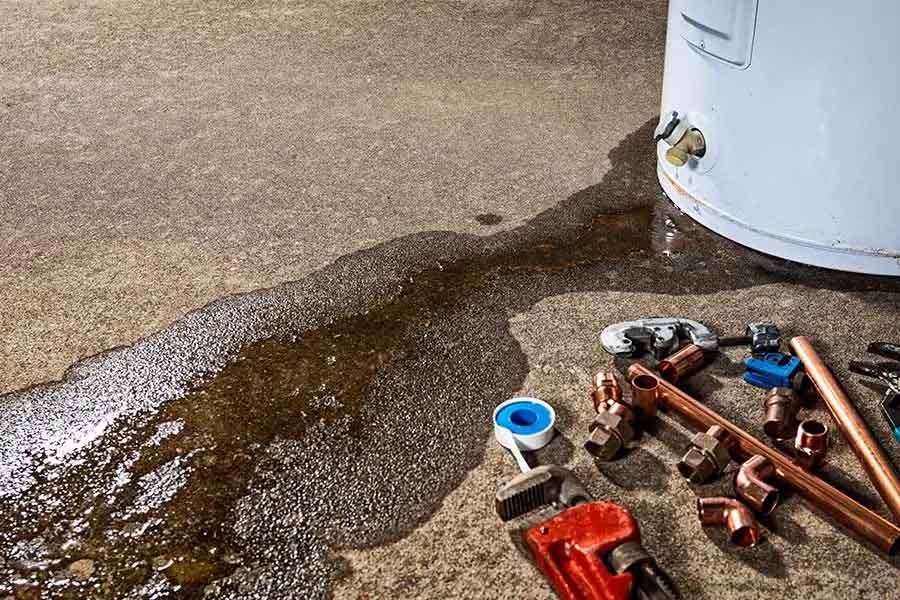
Before diving into repairs, it’s vital to inspect for visible leaks around your water heater. Spotting leaks early can save you from bigger issues down the line.
Here’s what to look for:
- Puddles: Check for any water accumulation beneath the unit.
- Rust or Corrosion: Look for rust spots on the tank or pipes.
- Wet Spots: Inspect the walls or floor near the heater for dampness.
- Dripping Water: Watch for any water dripping from valves or fittings.
If you notice any of these signs, it’s important to address them promptly. Ignoring leaks could lead to more extensive damage and costly repairs, so take the time to assess the situation carefully.
Check Drain Pan Condition
A well-maintained drain pan plays an indispensable role in protecting your home from water damage.
Start by inspecting the pan for any signs of leaks or water accumulation. If you notice water pooling, it could indicate a problem with your water heater or a clogged drain line.
Check the connections and verify they’re tight, as loose fittings can also lead to leaks. If the pan is rusted or damaged, it may need replacement.
Remember, addressing these issues promptly can save you from costly repairs down the line. Don’t hesitate to reach out to a professional if you’re unsure about how to fix the problem or if you need assistance.
Keeping your drain pan in good condition is vital for your home’s safety.
Monitor Surrounding Dampness
After verifying your drain pan is in good condition, it’s important to keep an eye on the surrounding area for any signs of dampness. Monitoring this can help you catch leaks early and prevent further damage.
Here are some key areas to check:
- Flooring: Look for water stains or warped wood near the water heater.
- Walls: Inspect for any discoloration or peeling paint around the unit.
- Pipes: Examine all connections and fittings for moisture or drips.
- Ventilation: Confirm there’s no humid air or condensation building up nearby.
If you notice any dampness, it’s essential to address it promptly. Ignoring these signs can lead to bigger issues, so stay vigilant!
Flush the Tank to Remove Sediment
Flushing the tank of your water heater is an essential step in maintaining its efficiency and longevity. Over time, sediment can build up at the bottom, reducing heating efficiency and potentially leading to damage.
To start, turn off the power supply or gas to your heater and close the cold-water supply valve. Next, attach a garden hose to the drain valve at the tank’s base and direct the hose to a suitable drainage area.
Open the drain valve and let the water flow out. You might notice cloudy water at first, which indicates sediment removal. After the tank empties, briefly turn on the cold-water supply to stir up any remaining sediment, then drain again.
Once the water runs clear, close the drain valve, remove the hose, and refill the tank by opening the cold-water supply valve. Finally, restore power or gas, and your water heater will be back in working order!
Test the Pressure Relief Valve
Once you’ve flushed your water heater to remove sediment, it’s time to check the pressure relief valve. This valve is essential for safety, preventing excess pressure from building up inside your tank.
Here’s how to test it:
- Locate the Valve: Find the pressure relief valve on top or side of your water heater.
- Prepare for Water: Place a bucket underneath the discharge pipe to catch any water.
- Lift the Lever: Gently lift the lever on the valve to release some water.
- Check for Leaks: Observe if water flows out and then stops when you release the lever. If it keeps leaking, you may need to replace the valve.
Testing the pressure relief valve regularly helps guarantee your water heater operates safely.
If you encounter any issues, don’t hesitate to reach out for professional help.
Call a Professional for Complex Issues
When you encounter complex issues with your water heater, it’s often best to call a professional. While you might feel tempted to tackle every problem yourself, certain issues can be tricky and even dangerous.
For example, if you’re dealing with electrical components, gas lines, or significant leaks, it’s essential to have an expert handle it.
Trifecta Plumbing’s trained technicians can diagnose and resolve these problems efficiently, minimizing the risk of further damage. They arrive with fully stocked vans, ready to address most issues in a single visit.
Plus, you’ll appreciate their upfront pricing, so you won’t face any surprises.
Investing in professional help not only guarantees your safety but also provides long-term solutions, reducing future breakdowns.
Conclusion
When your water heater’s on the fritz, don’t let frustration wash over you like a cold shower. By checking the power supply, inspecting the thermostat, and flushing the tank, you can restore the warmth to your home. If you spot leaks or face persistent issues, calling a professional can save you from a potential flood of problems. So, roll up your sleeves and tackle these tips to bring back the comfort of hot water in your life!